TsiClient
After starting at Microsoft full-time, one of my first projects was to update the build system for our team’s front-end library, TsiClient, a library for creating complex visualizations like the scatter plot below, easily. If your interested in the tech behind this scatter plot, I wrote another post about that here
This plot is created using these three lines of code

Where data is an array of json time-series data, and chartOptions / chartDataOptions are objects specifying how you want the chart to look.
What we started with
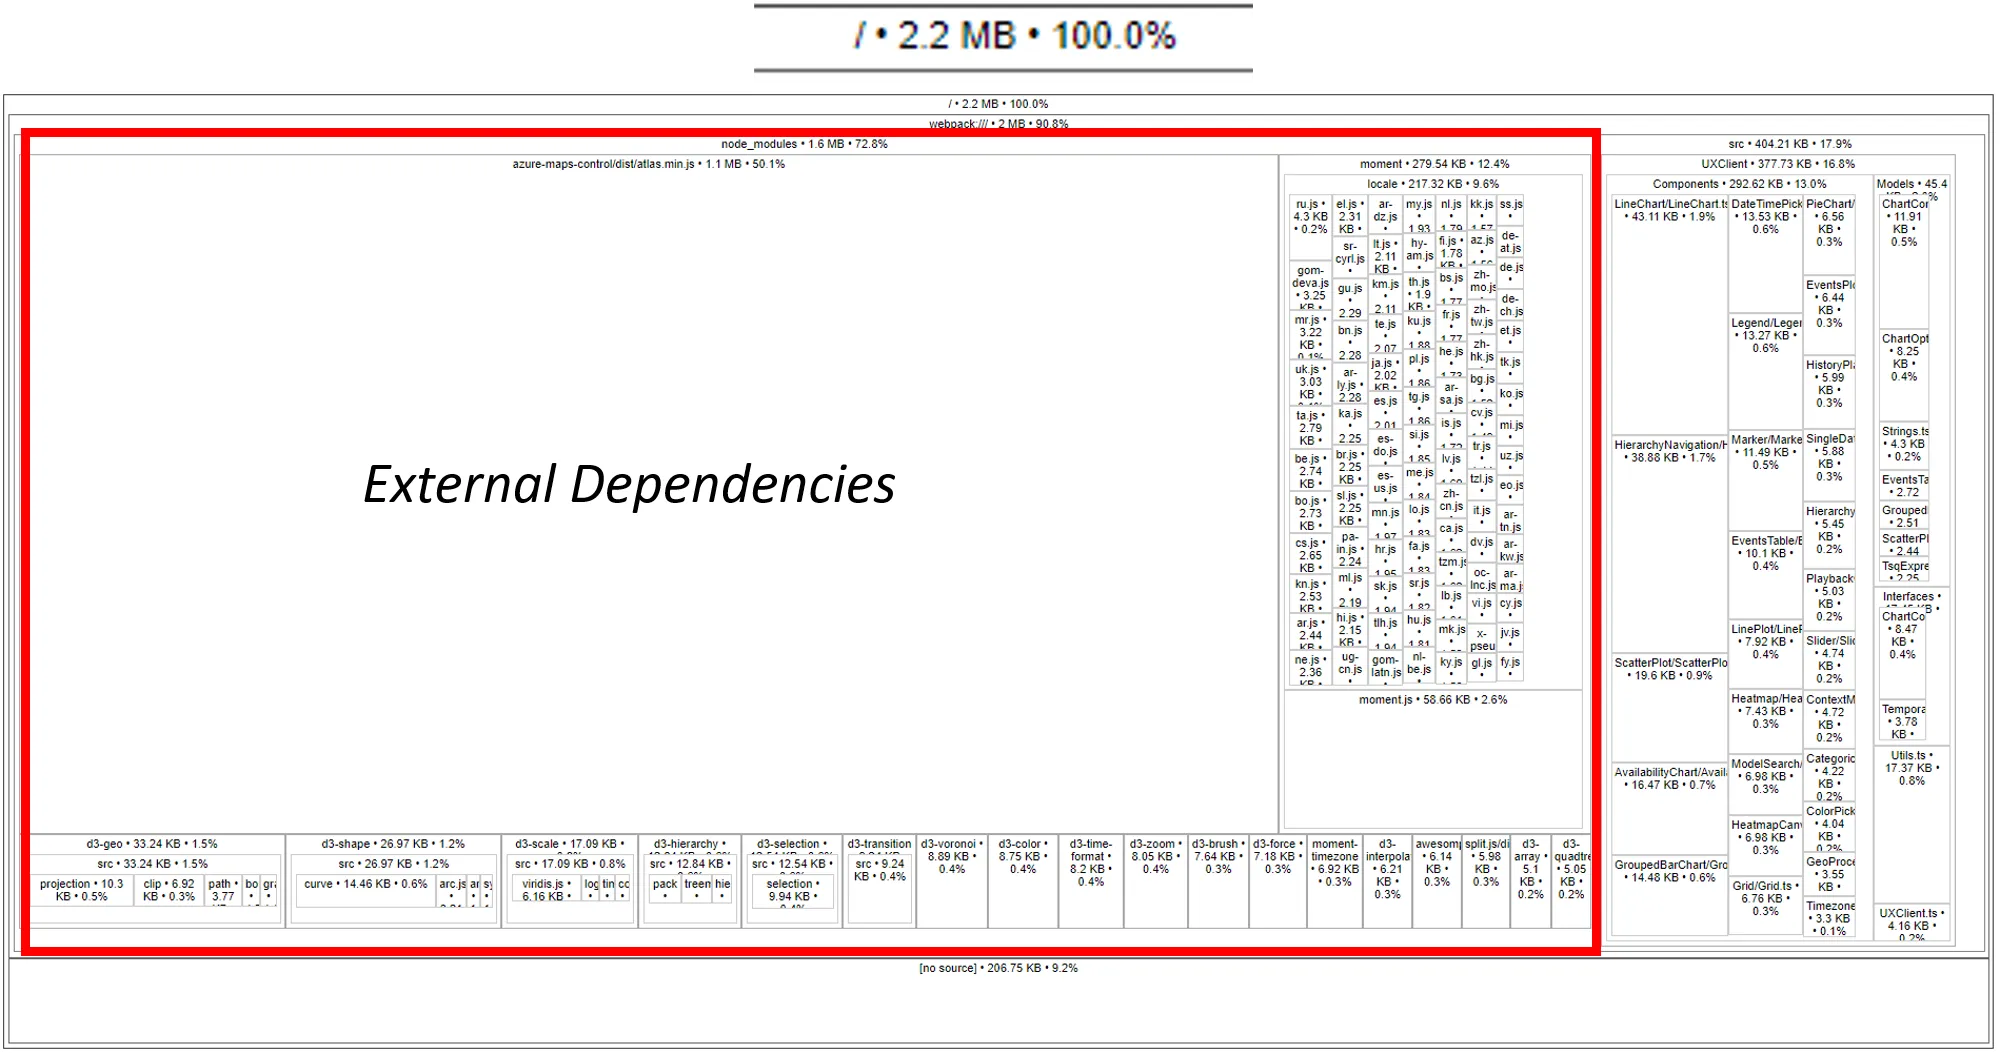
The scatter plot above is inserted into this page using a bundling technique know as Universal Module Definition (UMD), which bundles the libary code into a single TsiClient.js file. That file can then be included via script tag into this page. Sounds great right?
The problem is the size. Including all of TsiClient.js via UMD bundle creates a 2.2MB dependency for this page. That’s huge for just trying to create a scatter plot. The red box on the image below shows that the external dependencies for this library are bloating the size. That huuuuuge white square on the left shows the proportional size of an azure maps dependency that isn’t even being used by the scatter plot. Hmm, ok, so there’s room for improvement.
So, I did what any new front-end dev does when they have no idea what they’re doing… I hit the blogs.
I read about code splitting (separating code into multiple bundles), webpack and rollup (bundling technologies), type declarations (bundling typing files with the library), and tree shaking. Tree shaking is a buzzword in the world of bundling. Imagine a tree that represents your code. The healthy branches are the code that you actually need, while the dead branches are the code that isn’t being used (like the maps dependency). When you shake the tree, the dead branches (unused code) should fall out, leaving only the live branches (code being used).
So I tried to implement some of the techniques I read about, but nothing was working. Specifically, this syntax of tree shaking wasn’t working.
import { Scatterplot, LineChart } from 'tsiclient'
I had created an index file which exported references to each component in our library. The blogs had promised that webpack would be smart enough to tree shake the library using the syntax above if the consumer only wanted to import certain components, opposed to the entire library. Long story short, this wasn’t working. It would still bring in all of the unwanted dependencies, or, more frequenty, not work using this es-module (esm) syntax at all. Ok, so the magic of tree shaking wasn’t working. What else could I try?
I switched over to Rollup.js - a bundling technology more suited to libraries. I learned that there was an alternative to tree shaking called direct component imports. That syntax looks like this.
import Linechart from 'tsiclient/LineChart'
import Scatterplot from 'tsiclient/Scaterplot'
Rather than relying on tree shaking to trace what code is actually touched, why not just bundle each component into it’s own chunk, and only include that code if explicitly imported? So that’s exactly what I built.
A simple example
Here’s an example of how this works. In the image below, the left side represents a UMD build, while the right represents a multiple entry point build. To make things simple, this diagram illustrates a simple library for converting string cases.
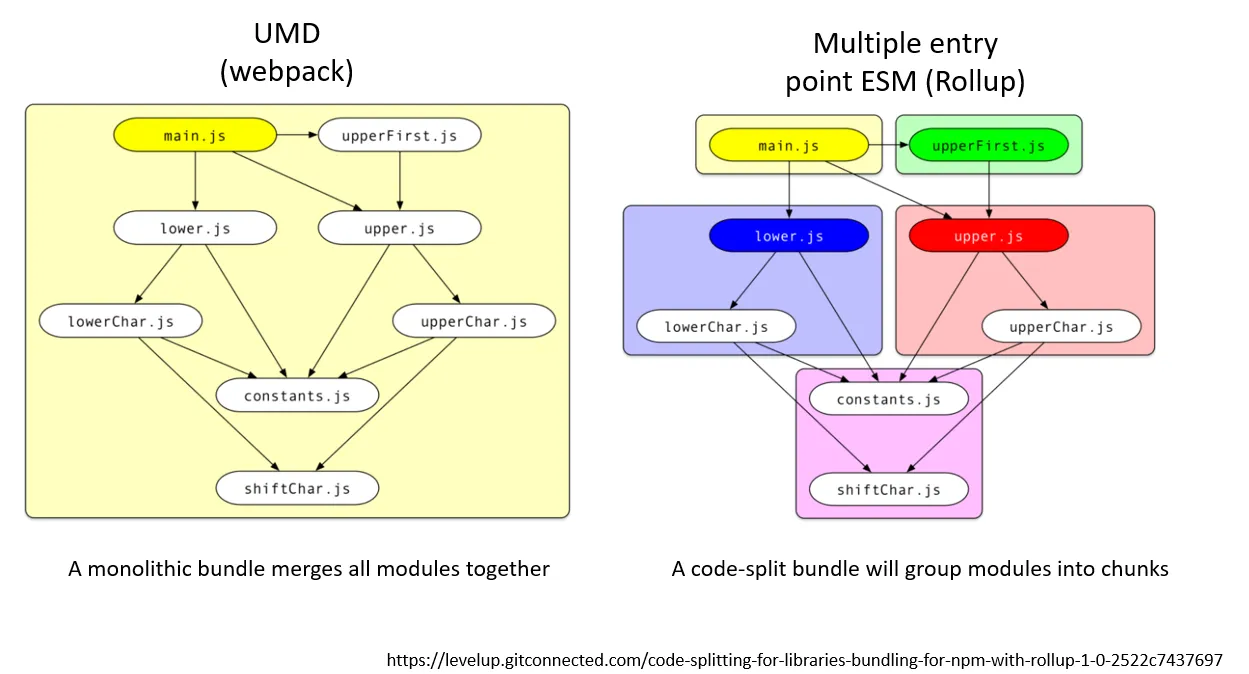
UMD
On the left, you can see all of the components bundled into a single file with one entry point, main.js. This technique is often useful if you need to include the library via script tag, or as a fallback for front-end / back-end apps which want to bring in the entire library.
ESM - direct component imports
On the right, you can see that the output is split into multiple entry points.
main.jswhich has references to the entire library,upperFirst.jswhich converts the first character of a string to uppercase and has a dependency on theupper.jschunklower.jswhich exposes an entry point for lower casing functionalityupper.jswhich exposes the upper casing functionality.
The pink chunk shown at the bottom contains shared dependencies between multiple output chunks. It is also separated into its own chunk to eliminate any code duplication.
So how does this work in practice? Well, if I only need the code which converts strings to lowercase, I’ll import the lower.js entry point. Something like this:
import lower from 'casing/lower.js'
That will bring in the blue chunk and the pink chunk shown in the diagram above. The entry file lower.js has references to the files that it needs: lowerChar.js and constants.js, and lowerChar.js has a reference to shiftChar.js so that is also imported.
So rather than importing the entire library, we just cut down this import to 4 files, only including what we actually use.
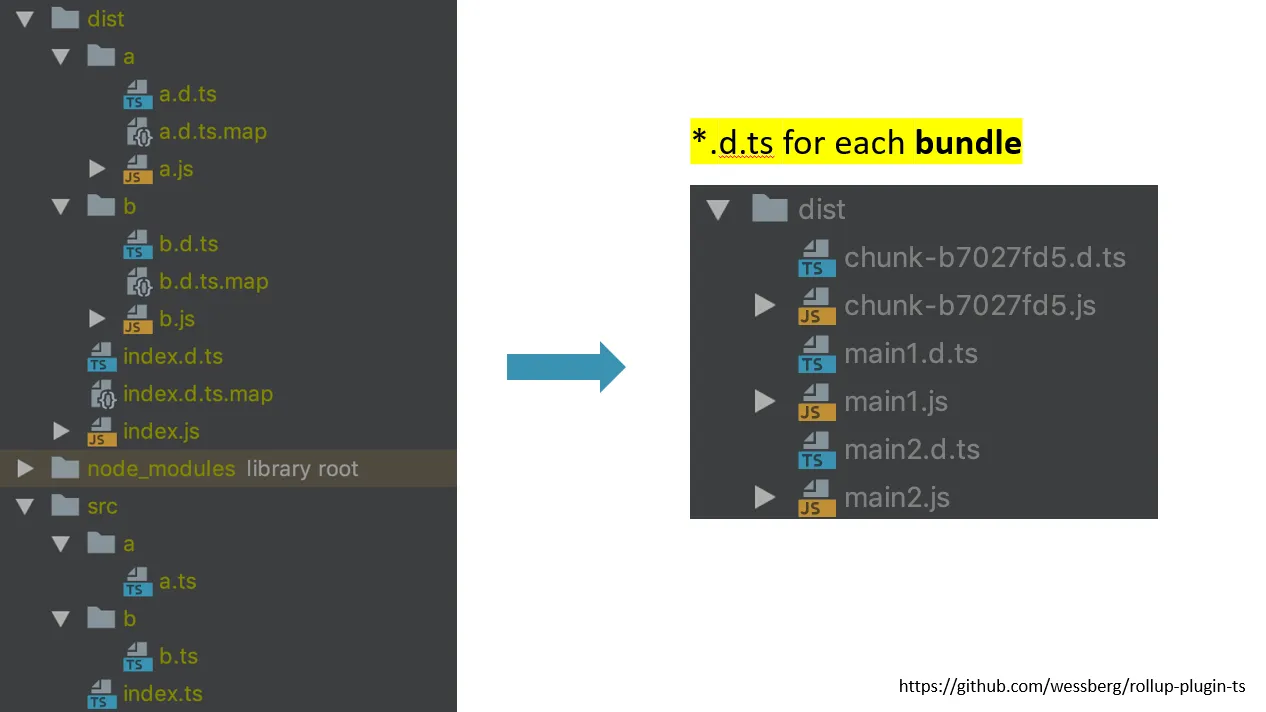
Type declarations
Last, but not least, I want to mention bundling type declaration files.
When authoring a TypeScript library, it’s important to include .d.ts typing files with your bundles. This will ensure that anyone using your library knows what parameters each function takes, how to properly construct your classes, and which types to pass around. Normally, when converting TypeScript code into JavaScript, the .d.ts typing files will be nested into a directory structure which matches the source code (shown on left in image below). This doesn’t work well when emitting bundles.
For the typings to be properly included into an application which consumes your library, the typing files must be in the same location, and with the same name as the bundled .js files (shown on right in image below). This ensures that any bundle you import will bring the associated typing file with it. Luckily, there’s an amazing Rollup plugin which does this for you. Whew.
Sugar on top
Converting to an optimized, direct component import pattern significantly reduces the dependency size of including the TsiClient library in an application. Here are some of the results.
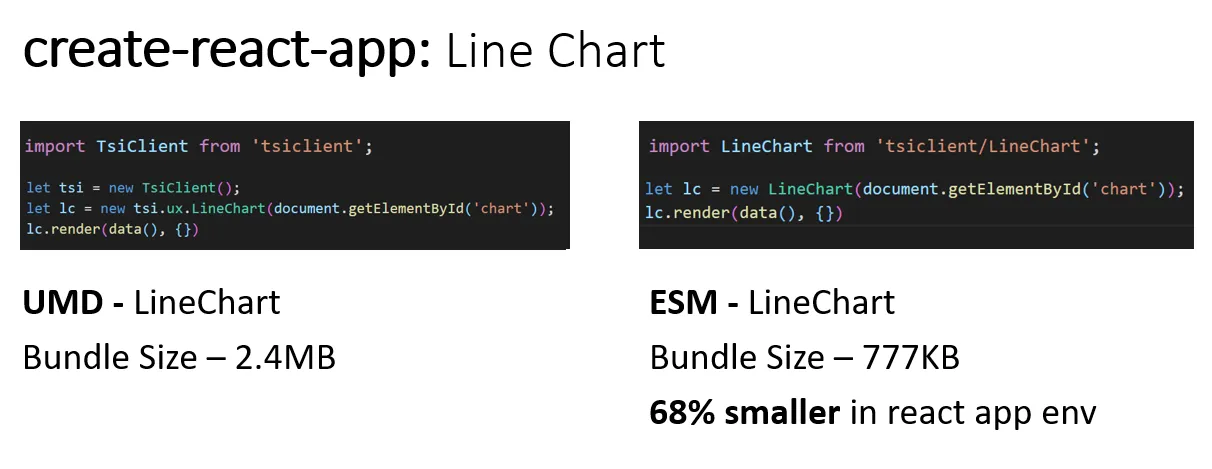
In the image above, on the left is the UMD, monolithic bundle approach, tested in a create-react-app, importing the LineChart.
On the right, is the es-module direct component import approach, tested in a create-react-app, importing the LineChart.
That’s a 68% reduction in size!
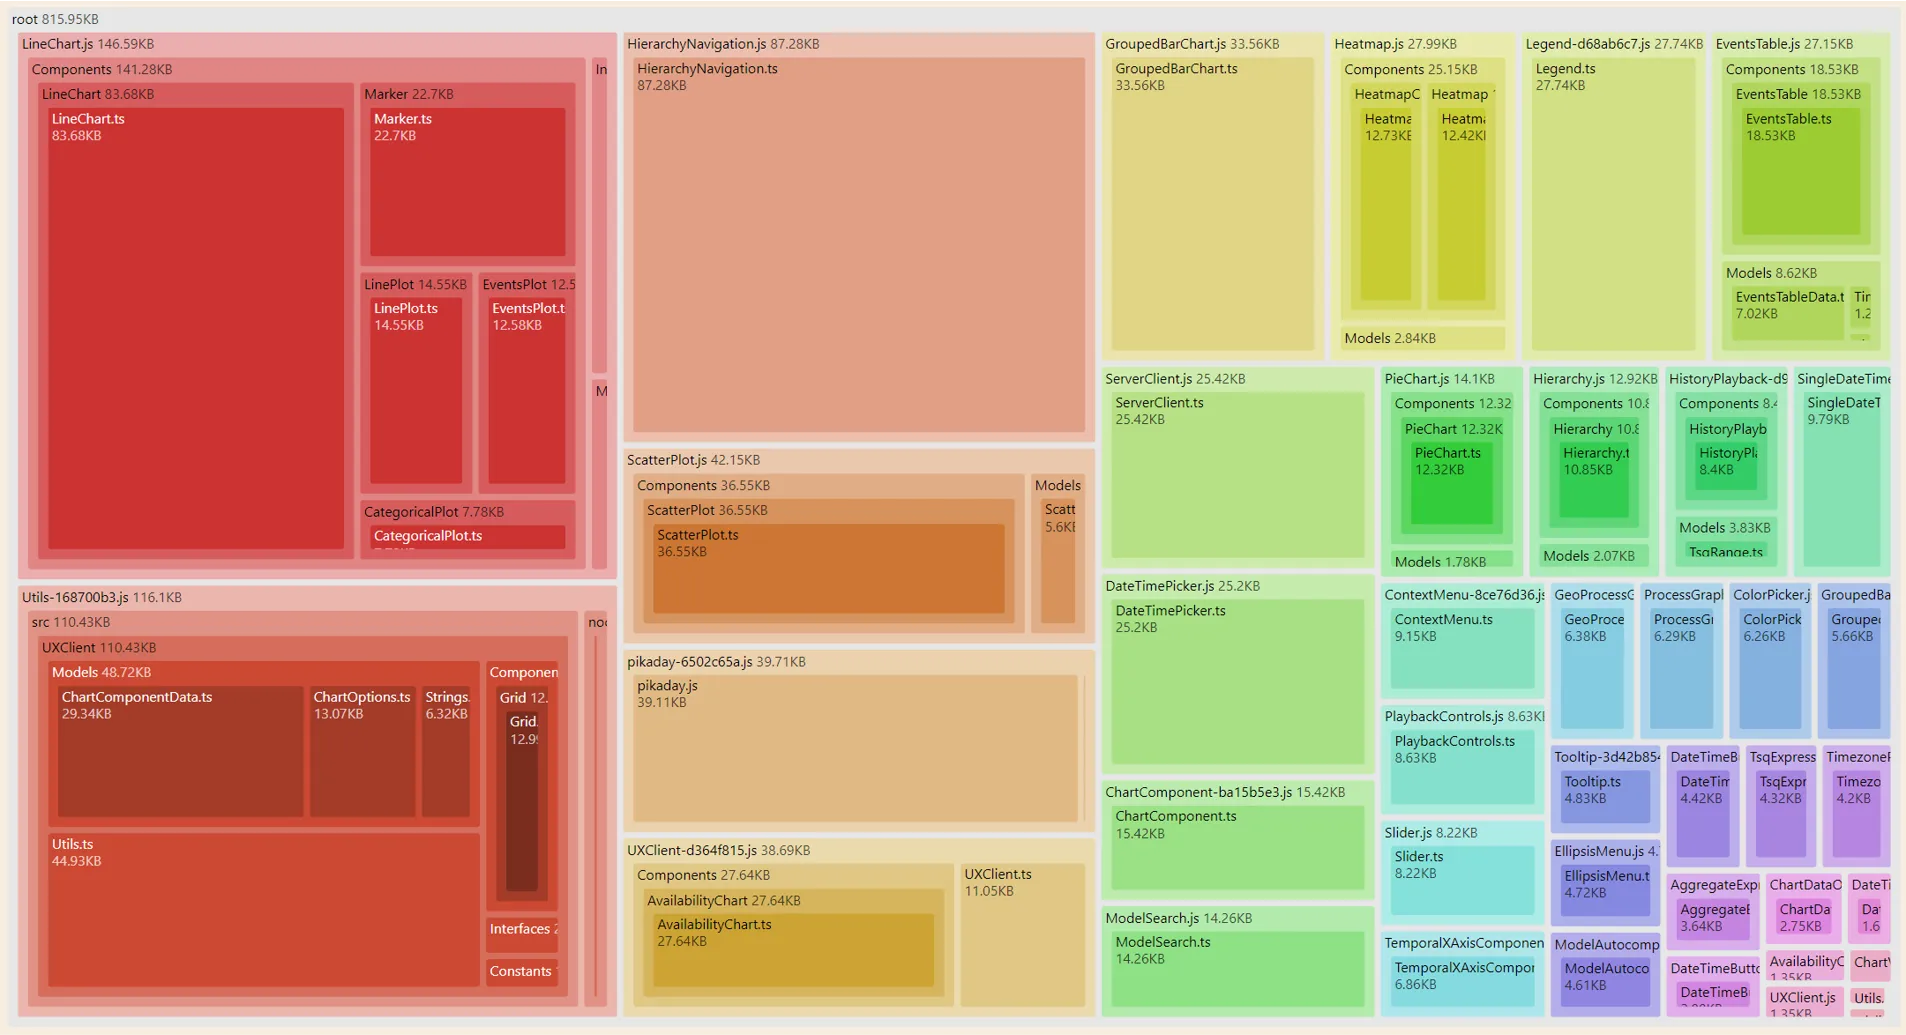
Here is a visualization of the optimized output bundles, where each colored square represents a different component of the library that can be directly imported.